AgentBuilder 用作 MCP 伺服器
AgentBuilder 與 Model Context Protocol (MCP) 整合,同時作為 MCP 伺服器和 MCP 客戶端。
此頁面描述如何將 AgentBuilder 用作 MCP 伺服器,將您的 Flow公開為 工具,供 MCP 客戶端 在產生回應時使用。
有關在FLOW內使用 AgentBuilder 作為 MCP 客戶端和管理 MCP 伺服器連接的資訊,請參閱 將 AgentBuilder 用作 MCP 客戶端。
先決條件
-
具有至少一個具有 Chat Output Components 的FLOW的 AgentBuilder 專案。
Chat Output Components是將FLOW用作 MCP 工具所必需的。
-
如果您想使用 MCP Inspector 來 測試和除錯FLOW,請在您的電腦上安裝任何 LTS 版本的 Node.js。
-
如果您想 部署公共 AgentBuilder 伺服器,請安裝 ngrok 和 ngrok authtoken。
將FLOW作為 MCP 工具提�供
每個 AgentBuilder 專案 都有一個 MCP 伺服器,將專案的 Flow作為工具公開,供 MCP 客戶端使用。
預設情況下,專案中的所有 Flow都會在專案的 MCP 伺服器上作為工具公開。 您可以通過管理 MCP 伺服器設定來更改公開的FLOW和工具元資料:
-
在 Projects 頁面 上點擊 MCP Server 標籤,或者在編輯FLOW時,點擊 Share,然後選取 MCP Server。
Flows/Tools 部分列出了當前在此 MCP 伺服器上作為工具提供的 Flow。
-
要切換公開的 Flow,請點擊 Edit Tools,然後選取您想要作為工具公開的 Flow。 要防止FLOW被用作工具,請清除第一欄中的核取方塊。
-
關閉 MCP Server Tools 對話框以儲存您的更改。
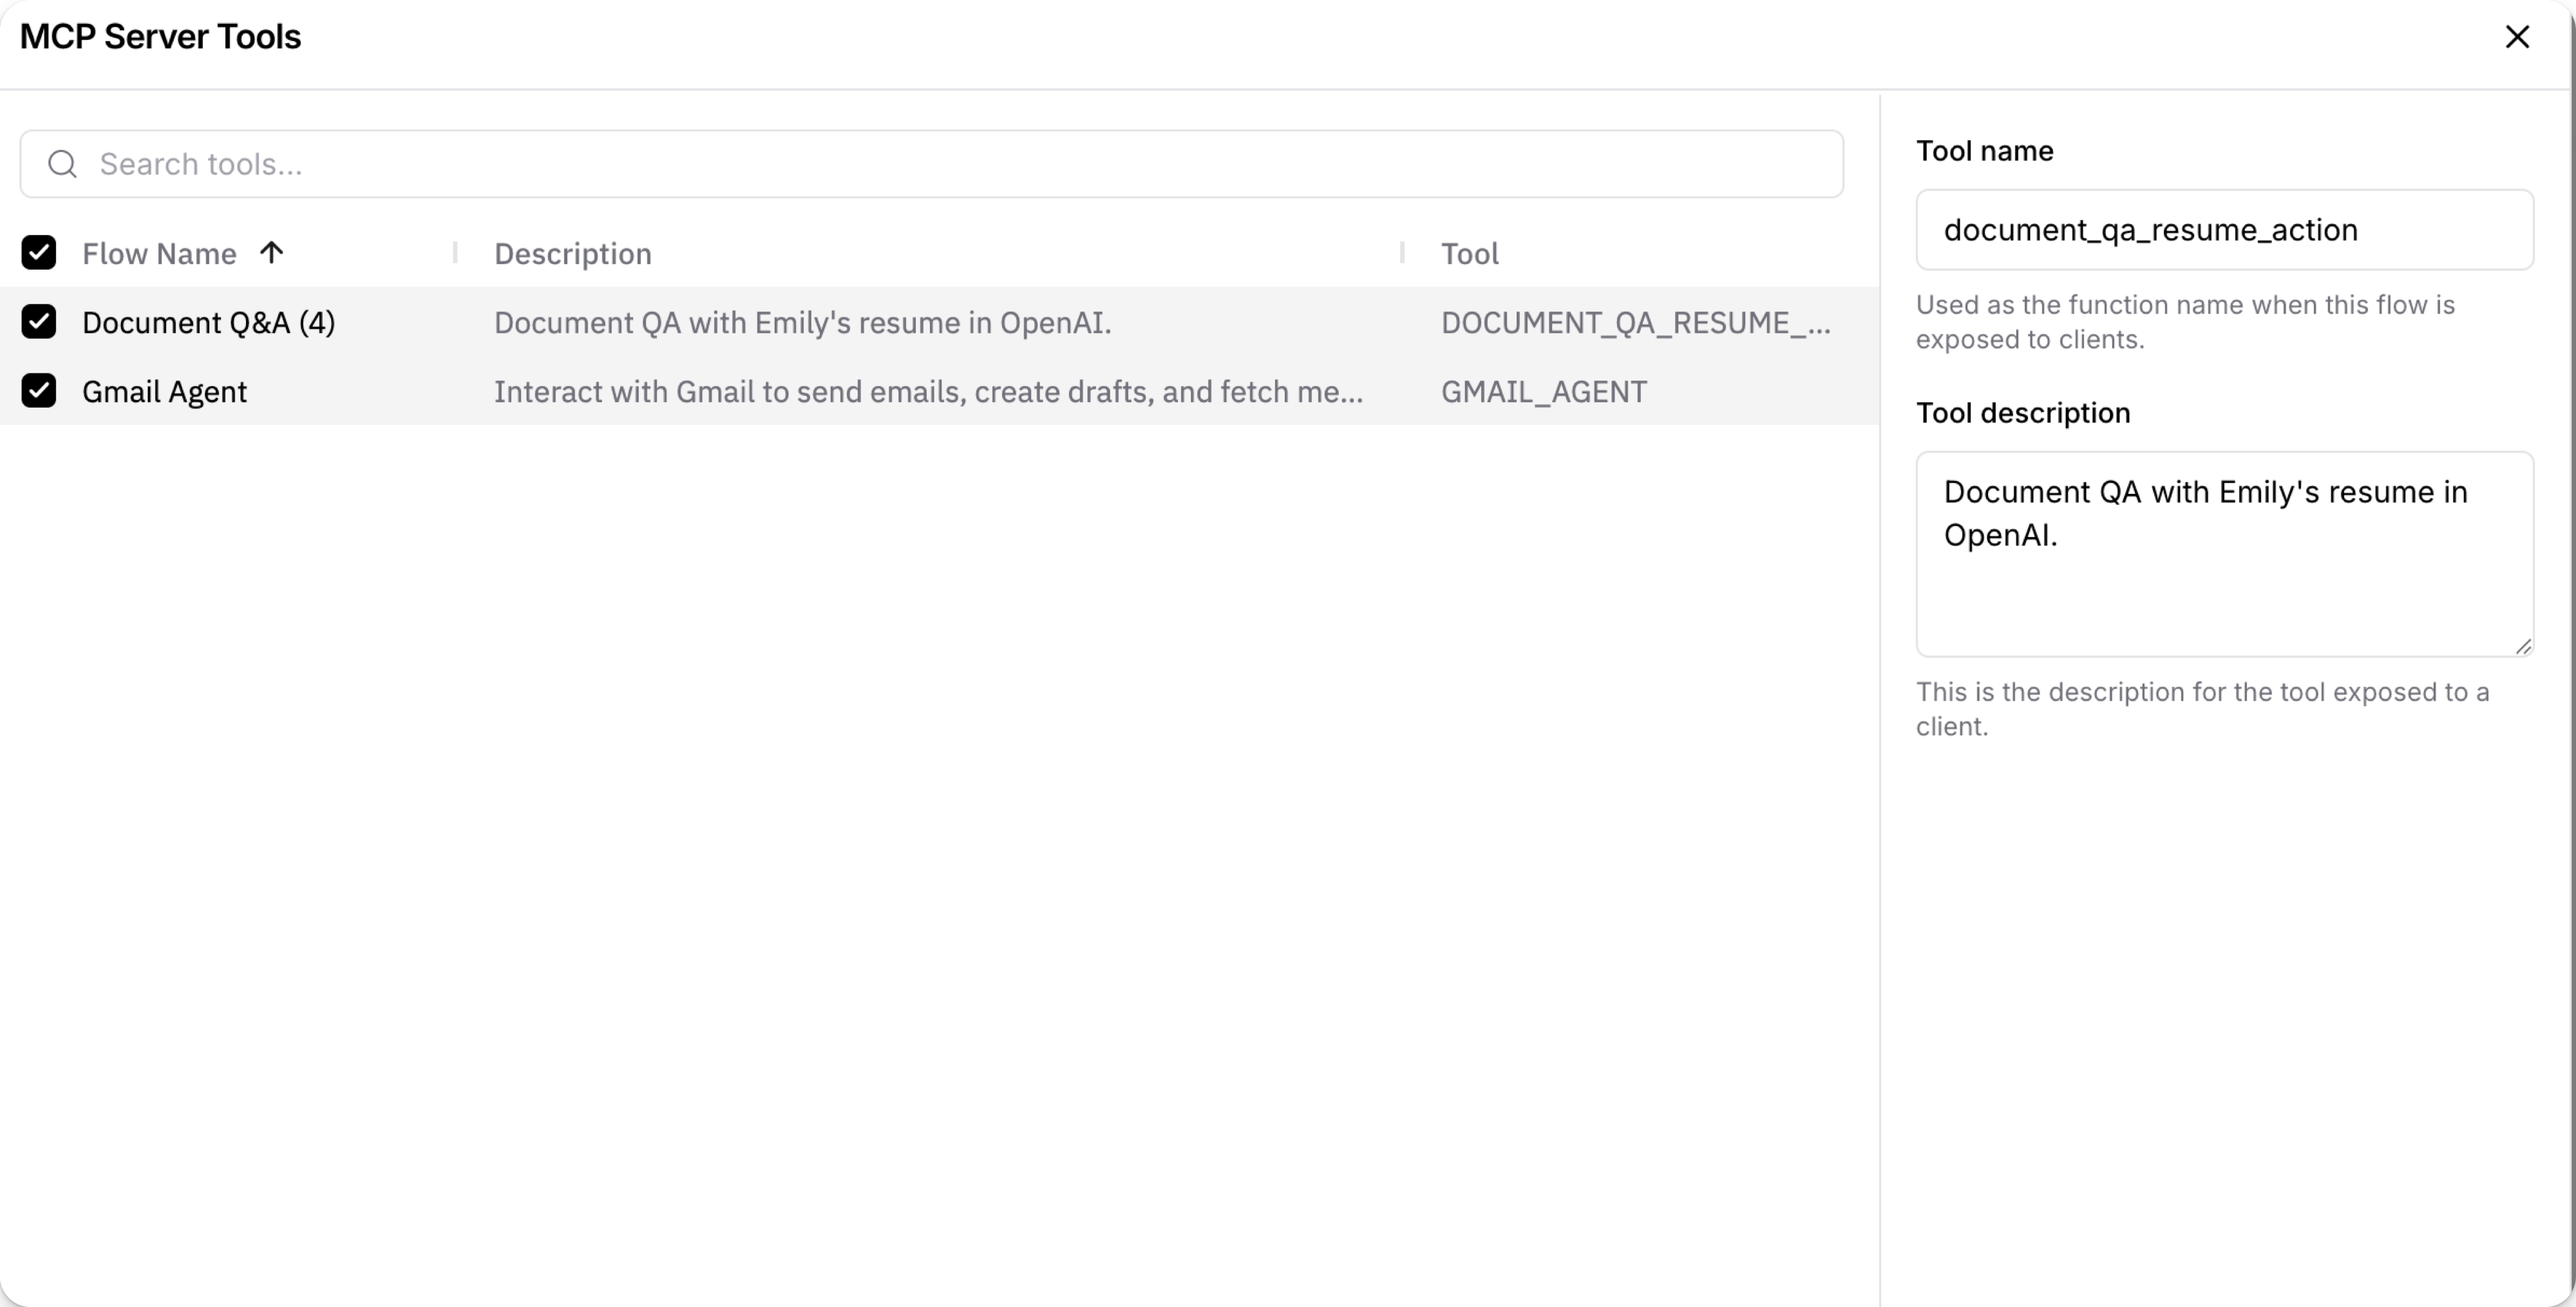
編輯FLOW工具名稱和描述
工具名稱和描述幫助 MCP 客戶端確定您的FLOW提供哪些動作以及何時使用這些動作。 建議為提供給 MCP 客戶端的所有工具提供清晰、描述性的名稱和描述。
要編輯 AgentBuilder MCP 伺服器上 Flow工具的名稱和描述,請執行以下操作:
-
在 Projects 頁面 上點擊 MCP Server 標籤,或者在編輯FLOW時,點擊 Share,然後選取 MCP Server。
-
點擊 Edit Tools。
-
點擊您想要編輯的 Description 或 Tool:
-
Tool name:輸入一個名稱,讓 Agent 清楚知道 Flow作為工具時的作用。
-
Tool description:輸入一個完整且準確描述 Flow執行的特定動作的描述。
-
-
關閉 MCP Server Tools 對話框以儲存您的更改。
工具名稱和描述的重要性
MCP 客戶端使用工具名稱和描述來確定在產生回應時使用哪些動作。
因為 MCP 客戶端將您的 AgentBuilder 專案視為單一 MCP 伺服器,並將所有啟用的 Flow列為工具,不清楚的名稱和描述可能會導致 Agent 錯誤或不一致地選取工具。
例如, Flow的預設工具名稱是FLOW ID,例如 adbbf8c7-0a34-493b-90ea-5e8b42f78b66。
這沒有向 Agent 提供有關FLOW類型或目的的資訊。
為了為您的 Flow提供更多上下文,請在配置 AgentBuilder 專案的 MCP 伺服器時確保清楚地命名和描述您的 Flow。
將這些名稱和描述視為函數名稱和程式碼註釋。 使用清晰的陳述來描述您的 Flow解決的問題。
範例:工具名稱和描述使用
例如,假設您基於 Document Q&A 模板建立一個 Flow,使用 LLM 與簡歷聊天,然後為 Flow提供以下名稱和描述:
-
Tool name:
document_qa_for_resume -
Tool description:
A flow for analyzing Emily's resume.
將您的 AgentBuilder MCP 伺服器連接到 Cursor 後,您可以詢問 Cursor 關於簡歷的問題,例如 What job experience does Emily have?。
使用您的工具名稱和描述提供的上下文,Agent 可以決定使用 document_qa_for_resume MCP 工具來建立關於 Emily 簡歷的回應。
如有必要,Agent 會在產生回應之前請求使用 Flow工具的許可。
如果您詢問不同的簡歷,例如 What job experience does Alex have?,Agent 可以決定 document_qa_for_resume 與此請求無關,因為工具描述指定 Flow是針對 Emily 的簡歷。
在這種情況下,Agent 可能會使用另一個可用工具,或者通知您它無法存取 Alex 的資訊。
例如:
_10I notice you're asking about Alex's job experience._10Based on the available tools, I can see there is a Document QA for Resume flow that's designed for analyzing resumes._10However, the description mentions it's for "Emily's resume" not Alex's. I don't have access to Alex's resume or job experience information.
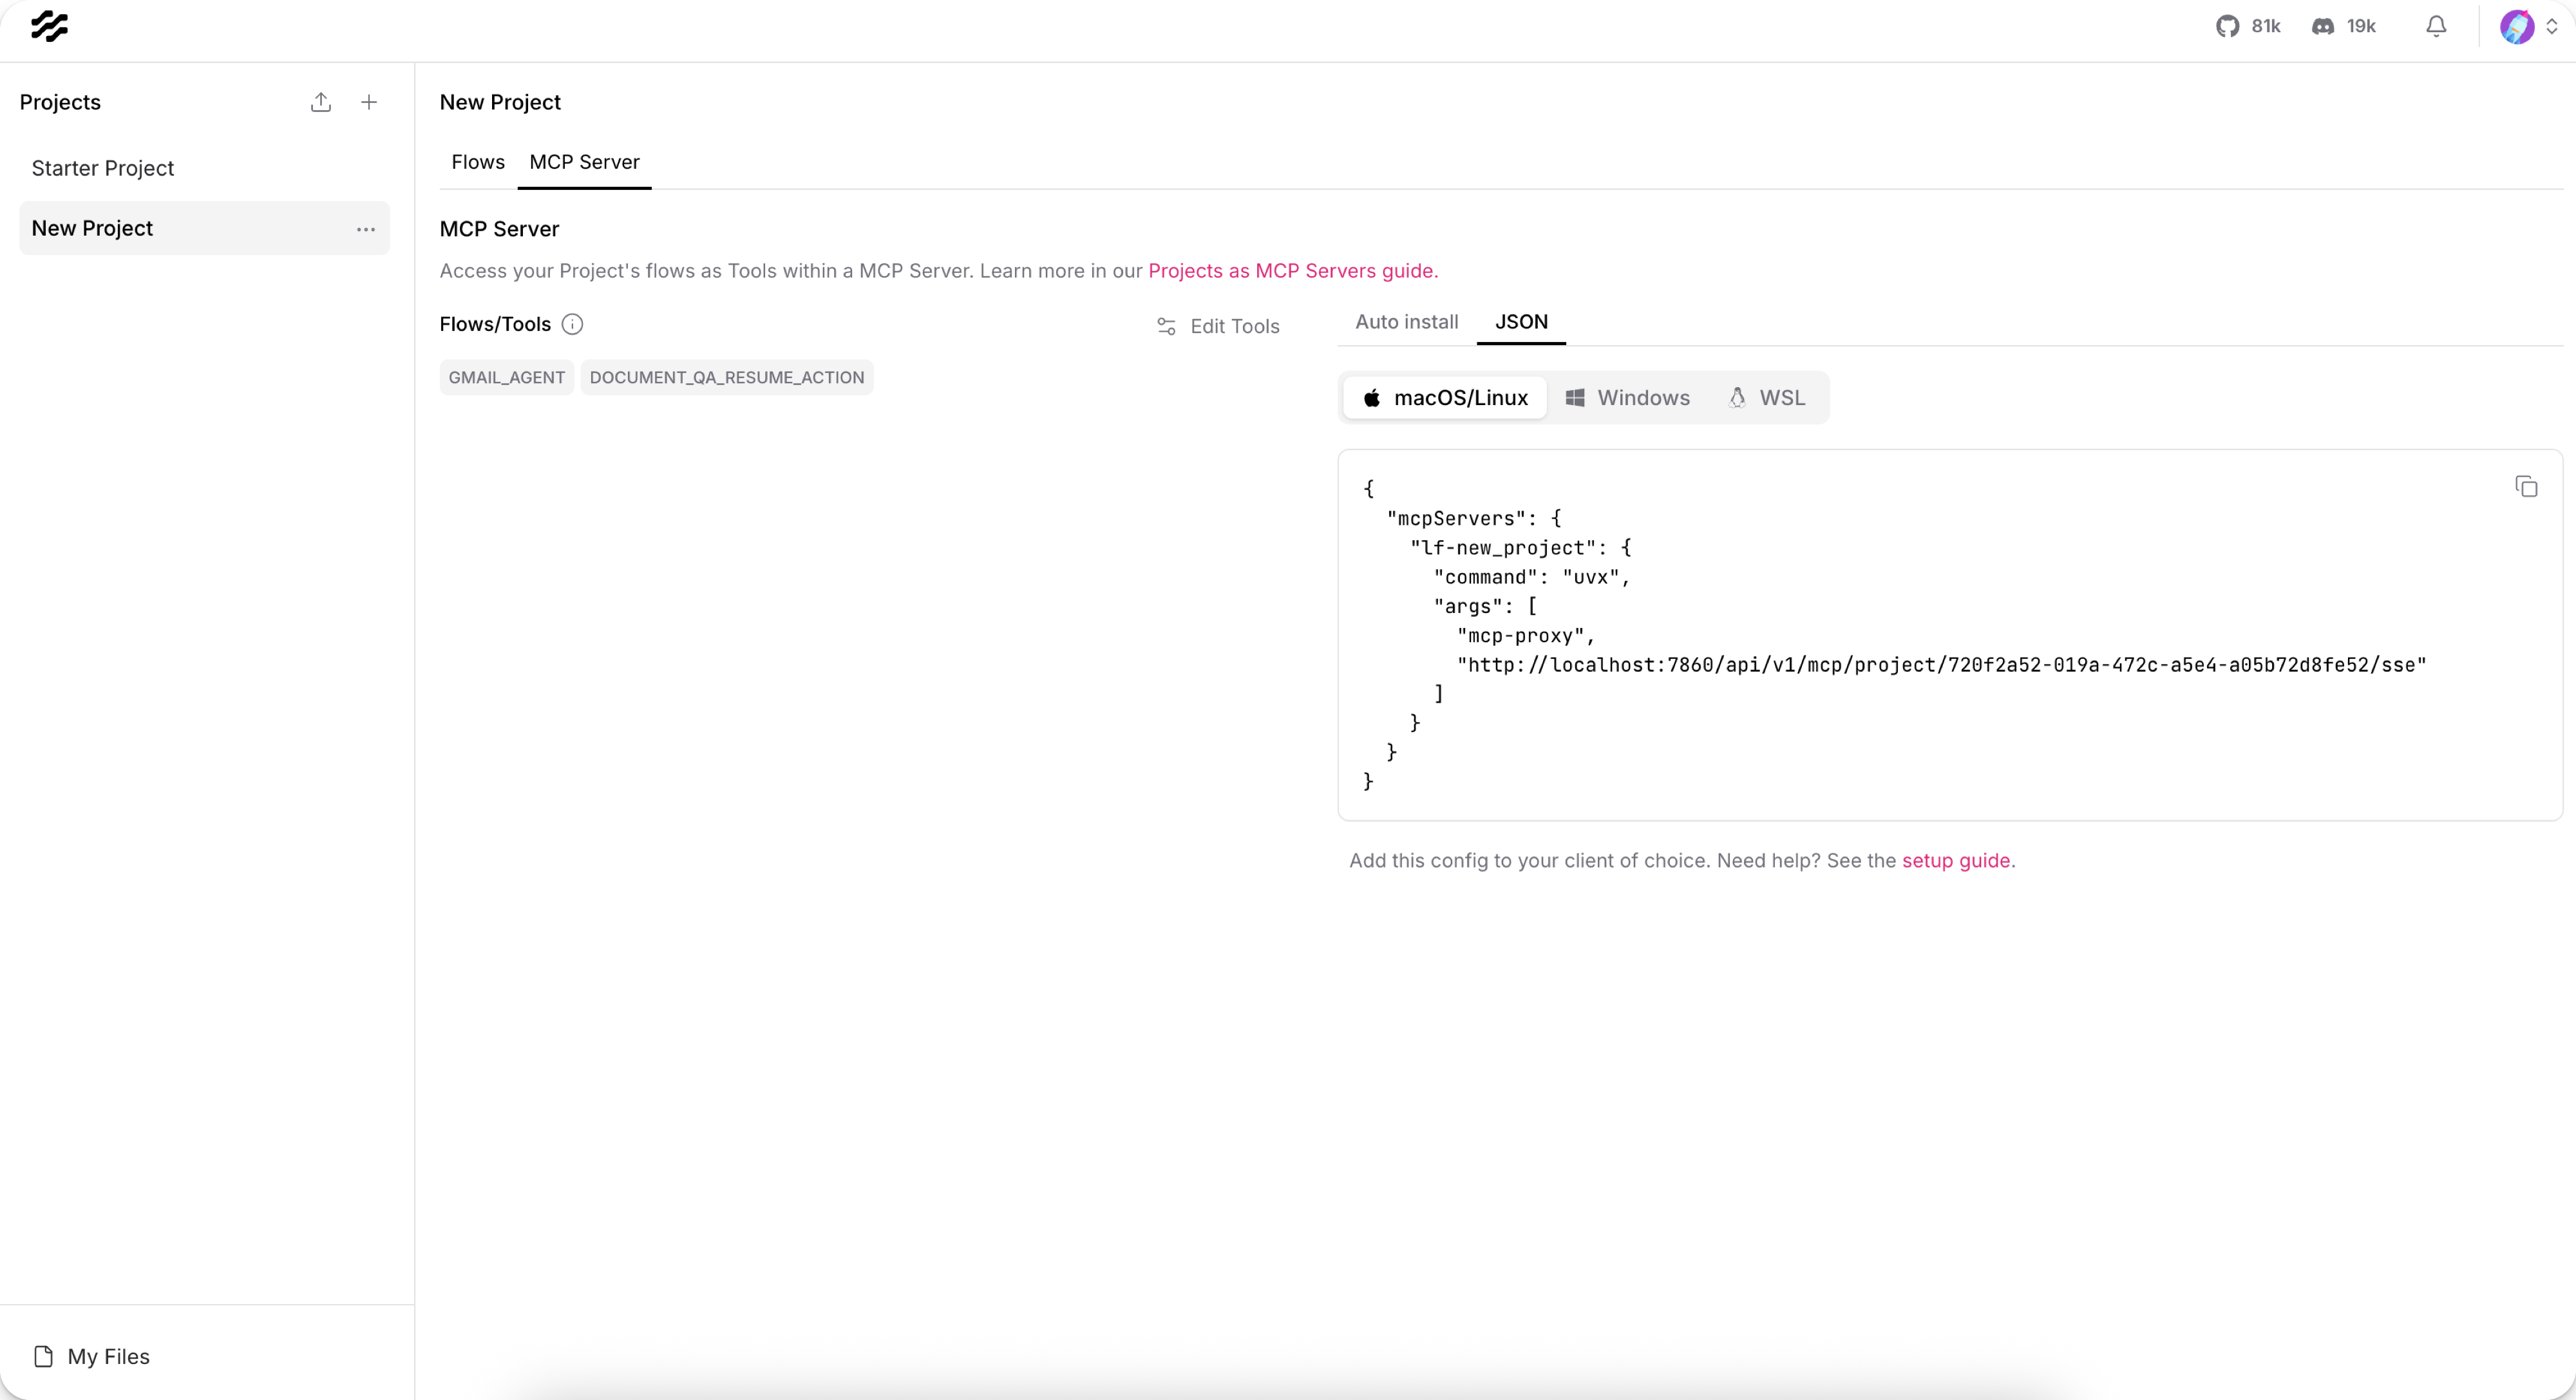
將客戶端連接到您的 AgentBuilder MCP 伺服器
AgentBuilder 提供自動安裝和程式碼片段來幫助您將 AgentBuilder MCP 伺服器部署到您的本地 MCP 客戶端。
- JSON
- Auto install
JSON 選項允許您將 AgentBuilder MCP 伺服器連接到任何本地或遠端 MCP 客戶端。 您可以為任何 MCP 相容客戶端 修改此FLOW。
-
安裝任何 MCP 相容客戶端。
這些步驟使用 Cursor 作為示例,但對於所有客戶端,FLOW基本相同,只是客戶端特定細節(如檔案名稱)略有不同。
-
在您的客戶端中,使用客戶端的 UI 或配置文件新增 MCP 伺服器。
例如,在 Cursor 中,前往 Cursor Settings,選取 MCP,然後點擊 Add New Global MCP Server 以開啟 Cursor 的全域
mcp.json配置文件。 -
建議:為您的 MCP 伺服器配置 認證。
-
在 AgentBuilder 中,在 Projects 頁面上,點擊 MCP Server 標籤。
-
點擊 JSON 標籤,複製適用於您的作業系統的程式碼片段,然後將其貼上到您的客戶端 MCP 配置文件中。 例如:
_11{_11"mcpServers": {_11"PROJECT_NAME": {_11"command": "uvx",_11"args": [_11"mcp-proxy",_11"http://LANGFLOW_SERVER_ADDRESS/api/v1/mcp/project/PROJECT_ID/sse"_11]_11}_11}_11}MCP Server 標籤會自動填入
PROJECT_NAME、LANGFLOW_SERVER_ADDRESS和PROJECT_ID值。預設 AgentBuilder 伺服器地址是
http://localhost:7860。 如果您使用 公共 AgentBuilder 伺服器,伺服器地址會自動包含。如果您的 AgentBuilder 伺服器需要認證,您必須在配置中包含您的 AgentBuilder API 金鑰或 OAuth 設定。 有關更多資訊,請參閱 MCP 伺服器認證。
-
要將其他環境變數與您的 MCP 伺服器命令一起包含,請新增包含環境變數鍵值對的
env物件:_14{_14"mcpServers": {_14"PROJECT_NAME": {_14"command": "uvx",_14"args": [_14"mcp-proxy",_14"http://LANGFLOW_SERVER_ADDRESS/api/v1/mcp/project/PROJECT_ID/sse"_14],_14"env": {_14"KEY": "VALUE"_14}_14}_14}_14} -
儲存並關閉您的客戶端 MCP 配置文件。
-
確認您的 AgentBuilder MCP 伺服器在客戶端的 MCP 伺服器列表中。 如有必要,重新啟動您的客戶端以應用修改後的配置文件。
自動安裝選項僅適用於特定 MCP 客戶端。 自動安裝需要客戶端在本機安裝,以便 AgentBuilder 可以寫入客戶端的配置文件。 如果您的客戶端不受支援、遠端安裝,或者您需要傳遞額外的環境變數,請使用 JSON 選項。
-
建議:為您的 MCP 伺服器配置 認證。
-
在 AgentBuilder 中,在 Projects 頁面上,點擊 MCP Server 標籤。
-
在 Auto install 標籤上,找到您的 MCP 客戶端提供者,然後點擊 Add。
您的 AgentBuilder 專案 MCP 伺服器會自動新增到您的本地 Cursor、Claude 或 Windsurf 客戶端的配置文件中。 例如,使用 Cursor 時,伺服器配置會新增到
mcp.json配置文件中。AgentBuilder 會嘗試新增此配置,即使選取的客戶端未安裝。 要驗證安裝,請檢查您的客戶端中的可用 MCP 伺服器。
一旦您的 MCP 客戶端連接到您的 AgentBuilder 專案 MCP 伺服器,您的 Flow就會註冊為工具。 Cursor 會根據您的查詢決定何時使用工具,並在必要時請求許可。 有關更多資訊,請參閱您的客戶端的 MCP 文檔,例如 Cursor 的 MCP 文檔。
MCP 伺服器認證
每個 AgentBuilder 專案 都有自己的 MCP 伺服器,具有自己的 MCP 伺服器認證設定。
要為 AgentBuilder MCP 伺服器配置認證,請前往 AgentBuilder 中的 Projects 頁面,點擊 MCP Server 標籤,點擊 Edit Auth,然後選取您的首選認證方法:
- API key
- OAuth
- None
當使用 AgentBuilder API 金鑰認證您的 MCP 伺服器時,您的專案 MCP 伺服器 JSON 程式碼片段和 Auto install 配置會自動包含 --headers 和 x-api-key 參數。
點擊 Generate API key 以自動將新的 AgentBuilder API 金鑰插入程式碼模板中。
或者,您可以用現有的 AgentBuilder API 金鑰替換 YOUR_API_KEY。
啟用 OAuth 時,AgentBuilder 會自動為您的專案啟動 MCP Composer 實例,在 MCP 客戶端和伺服器上的 mcp-proxy 之間建立安全的 client proxy。
OAuth 整合允許您的 AgentBuilder MCP 伺服器通過任何 OAuth 2.0 相容服務認證使用者和應用程式。當使用者和應用程式連接到您的 MCP 伺服器時,他們會被重新導向到您選擇的 OAuth 提供者進行認證。成功認證後,他們會被授予存取您的FLOW作為 MCP 工具的權限。
在 AgentBuilder 中配置 OAuth 之前,您必須首先使用外部 OAuth 2.0 服務提供者設定 OAuth 應用程式。 您必須將您的 AgentBuilder 伺服器註冊為 OAuth 客戶端,然後取得在 AgentBuilder 中完成配置所需的值。
下表描述了所需的值。 GitHub OAuth 用於示例目的。 請務必使用您自己的部署的實際值。 有關更多資訊,請參閱您的 OAuth 提供者的文檔。
| 欄位 | 描述 | 來源 | 示例 |
|---|---|---|---|
| Host | OAuth 伺服器主機 | MCP Composer 預設。 | localhost |
| Port | OAuth 伺服器連接埠 | MCP Composer 預設。 | 9000 |
| Server URL | 完整 OAuth 伺服器 URL | 結合 MCP Composer 預設 OAuth 主機和連接埠。 | http://localhost:9000 |
| Callback Path | 您伺服器上的 OAuth 回呼 URL | 您在 OAuth 應用註冊期間定義此地址。 | http://localhost:9000/auth/idaas/callback |
| Client ID | 您的 OAuth 客戶端識別碼 | 來自您的 OAuth 提供者。 | Ov23li9vx2grVL61qjb |
| Client Secret | 您的 OAuth 客戶端密碼 | 來自您的 OAuth 提供者。 | 1234567890abcdef1234567890abcdef12345678 |
| Authorization URL | OAuth 授權端點 | 來自您的 OAuth 提供者。 | https://github.com/login/oauth/authorize |
| Token URL | 用於取得重新整理權杖的 OAuth 權杖端點 | 來自您的 OAuth 提供者。 | https://github.com/login/oauth/access_token |
| MCP Scope | MCP 操作的範圍 | 您定義此項。截至 AgentBuilder 1.6,user 是唯一可用值。 | user |
| Provider Scope | OAuth 提供者範圍 | �您定義此項。截至 AgentBuilder 1.6,openid 是唯一可用值。 | openid |
要配置 OAuth 認證:
-
選取 OAuth 作為認證類型。
-
使用來自您的 OAuth 部署的值配置 OAuth 設定。 所有值都是必需的。
OAuth 憑證會加密並安全地儲存在您的 AgentBuilder 資料庫中。
-
點擊 Save。
您的 MCP 伺服器的 JSON 程式碼片段和 Auto install 配置會自動使用 OAuth 值更新。啟用 OAuth 後,這些會自動用於新安裝。但是,您必須手動更新任何現有安裝,如下一步所述。
-
如果您已經在您的 MCP 客戶端中安裝了您的 AgentBuilder MCP 伺服器,在您的 MCP 伺服器上啟用 OAuth 後,您必須更新您的 MCP 客戶端配置以使用新的 OAuth 設定。客戶端更新方法取決於您在客戶端上安裝伺服器的方式:
- Auto install:使用 JSON 標籤中的更新 JSON 片段手動更新您的客戶端配置文件,或者重複 Auto-install 中的步驟以使用更新設定重新安裝客戶端。
- JSON option:複製 JSON 標籤中的更新 JSON 片段並替換您的現有配置。
- 新連接:使用 Auto install 或 JSON 選項。OAuth 設定會自動包含。
在您啟用 OAuth 並更新您的客戶端配置後,每次您的 MCP 客戶端嘗試與伺服器認證時都會開啟 OAuth 回呼視窗。
成功認證會返回 Authentication complete. You may close this window.
如果您的客戶端沒有開啟 OAuth 視窗,請嘗試重新啟動客戶端以取得更新配置。
未配置認證時,您�的 MCP 伺服器會成為公共端點,任何人都可以在不提供憑證的情況下存取。 僅在 AgentBuilder 在受信任環境中運行時使用此選項。
MCP 伺服器環境變數
以下環境變數設定與您的 AgentBuilder 專案 MCP 伺服器相關的行為:
| 變數 | 格式 | 預設 | 描述 |
|---|---|---|---|
LANGFLOW_MCP_SERVER_ENABLED | Boolean | True | 是否為您的每個 AgentBuilder 專案初始化 MCP 伺服器。如果為 false,AgentBuilder 不會初始化 MCP 伺服器。 |
LANGFLOW_MCP_SERVER_ENABLE_PROGRESS_NOTIFICATIONS | Boolean | False | 如果為 true,AgentBuilder MCP 伺服器會發送進度通知。 |
LANGFLOW_MCP_SERVER_TIMEOUT | Integer | 20 | MCP 伺服器操作因連線不良或長時間運行請求而過期之前的秒數。 |
LANGFLOW_MCP_MAX_SESSIONS_PER_SERVER | Integer | 10 | 每個唯一伺服器保留的最大 MCP 工作階段數。 |
外部部署您的 AgentBuilder MCP 伺服器
要外部部署您的 AgentBuilder MCP 伺服器,請參閱 部署公共 AgentBuilder 伺服器。
使用 MCP Inspector 測試和除錯FLOW
MCP Inspector 需要在您的電腦上安裝任何 LTS 版本的 Node.js。
MCP Inspector 是測試和除錯 MCP 伺服器的常用工具。 您可以使用 MCP Inspector 監控您的FLOW並深入了解它們如何被 MCP 伺服器消費。
-
安裝 MCP Inspector:
_10npx @modelcontextprotocol/inspector有關配置 MCP Inspector 的更多資訊,包括指定 proxy port,請參閱 MCP Inspector GitHub 專案。
-
開啟網路瀏覽器並導航到 MCP Inspector UI。 預設地址是
http://localhost:6274。 -
在 MCP Inspector UI 中,輸入�您的 AgentBuilder 專案 MCP 伺服器的連接詳細資訊。 欄位值取決於您的伺服器 認證 方法。
- API key
- OAuth
- None
- Transport Type:選取 STDIO。
- Command:
uvx - Arguments:以空格分隔輸入以下參數列表。將
YOUR_API_KEY、LANGFLOW_SERVER_ADDRESS和PROJECT_ID的值替換為您的 AgentBuilder MCP 伺服器中的值。例如:_10mcp-proxy --headers x-api-key YOUR_API_KEY http://LANGFLOW_SERVER_ADDRESS/api/v1/mcp/project/PROJECT_ID/sse
- Transport Type:選取 STDIO。
- Command:
uvx - Arguments:以空格分隔輸入以下參數列表。將
OAUTH_SERVER_URL的值替換為您的 OAuth 伺服器的 URL。例如:_10mcp-composer --mode stdio --sse-url http://localhost:9000/sse --disable-composer-tools --client_auth_type oauth
- Transport Type:選取 SSE。
- URL:輸入 AgentBuilder MCP 伺服器的
sse端點。例如:_10http://localhost:7860/api/v1/mcp/project/d359cbd4-6fa2-4002-9d53-fa05c645319c/sse
-
點擊 Connect。
如果連接成功,您應該會在 Tools 標籤中看到您的專案 Flow。 從這個標籤,您可以監控您的 Flow如何被註冊為 MCP 的工具,以及使用自訂輸入值測試工具。
-
要退出 MCP Inspector,請在啟動它的同一終端視窗中按 Control+C。
疑難排解 AgentBuilder MCP 伺服器
有關 MCP 伺服器和客戶端的疑難排解建議,請參閱 AgentBuilder 文件。
另請參閱
Deploy your AgentBuilder MCP server externally
To deploy your AgentBuilder MCP server externally, see Deploy a public AgentBuilder server.
Use MCP Inspector to test and debug flows
MCP Inspector requires any LTS version of Node.js installed on your computer.
MCP Inspector is a common tool for testing and debugging MCP servers. You can use MCP Inspector to monitor your flows and get insights into how they are being consumed by the MCP server.
-
Install MCP Inspector:
_10npx @modelcontextprotocol/inspectorFor more information about configuring MCP Inspector, including specifying a proxy port, see the MCP Inspector GitHub project.
-
Open a web browser and navigate to the MCP Inspector UI. The default address is
http://localhost:6274. -
In the MCP Inspector UI, enter the connection details for your AgentBuilder project's MCP server. The field values depend on your server's method of authentication.
- API key
- OAuth
- None
- Transport Type: Select STDIO.
- Command:
uvx - Arguments: Enter the following list of arguments, separated by spaces. Replace the values for
YOUR_API_KEY,LANGFLOW_SERVER_ADDRESS, andPROJECT_IDwith the values from your AgentBuilder MCP server. For example:_10mcp-proxy --headers x-api-key YOUR_API_KEY http://LANGFLOW_SERVER_ADDRESS/api/v1/mcp/project/PROJECT_ID/sse
- Transport Type: Select STDIO.
- Command:
uvx - Arguments: Enter the following list of arguments, separated by spaces. Replace the value for
OAUTH_SERVER_URLwith the URL of your OAuth server. For example:_10mcp-composer --mode stdio --sse-url http://localhost:9000/sse --disable-composer-tools --client_auth_type oauth
- Transport Type: Select SSE.
- URL: Enter the AgentBuilder MCP server's
sseendpoint. For example:_10http://localhost:7860/api/v1/mcp/project/d359cbd4-6fa2-4002-9d53-fa05c645319c/sse
-
Click Connect.
If the connection was successful, you should see your project's flows in the Tools tab. From this tab, you can monitor how your flows are being registered as tools by MCP, as well as test the tools with custom input values.
-
To quit MCP Inspector, press Control+C in the same terminal window where you started it.
Troubleshoot AgentBuilder MCP servers
For troubleshooting advice for MCP servers and clients, see AgentBuilder documentation.