快速入門
透過載入範本 Flow、執行它,然後在 /run API EndPoint 提供它,開始使用 AgentBuilder。
先決條件
-
運行中的 AgentBuilder 伺服器
-
建立 AgentBuilder API 金鑰
AgentBuilder API 金鑰是您可以與 AgentBuilder 一起使用的使用者特定權杖。
要建立 AgentBuilder API 金鑰,請執行以下操作:
-
在 AgentBuilder 中,點擊您的使用者圖示,然後選取設定。
-
點擊 AgentBuilder API Keys,然後點擊 Add New。
-
為您的金鑰命名,然後點擊 Create API Key。
-
複製 API 金鑰並安全儲存。
-
要在請求中使用您的 AgentBuilder API 金鑰,請在您的終端機中設定
AGENTBUILDER_API_KEY環境變數,然後在您的請求中包含x-api-key標頭或查詢參數。 例如:_13# 設定變數_13export AGENTBUILDER_API_KEY="sk..."_13_13# 傳送請求_13curl --request POST \_13--url "http://AGENTBUILDER_SERVER_ADDRESS/api/v1/run/FLOW_ID" \_13--header "Content-Type: application/json" \_13--header "x-api-key: $AGENTBUILDER_API_KEY" \_13--data '{_13"output_type": "chat",_13"input_type": "chat",_13"input_value": "Hello"_13}'
-
執行 Simple Agent 範本 Flow
- 在 AgentBuilder 中,點擊 New Flow,然後選取 Simple Agent 範本。
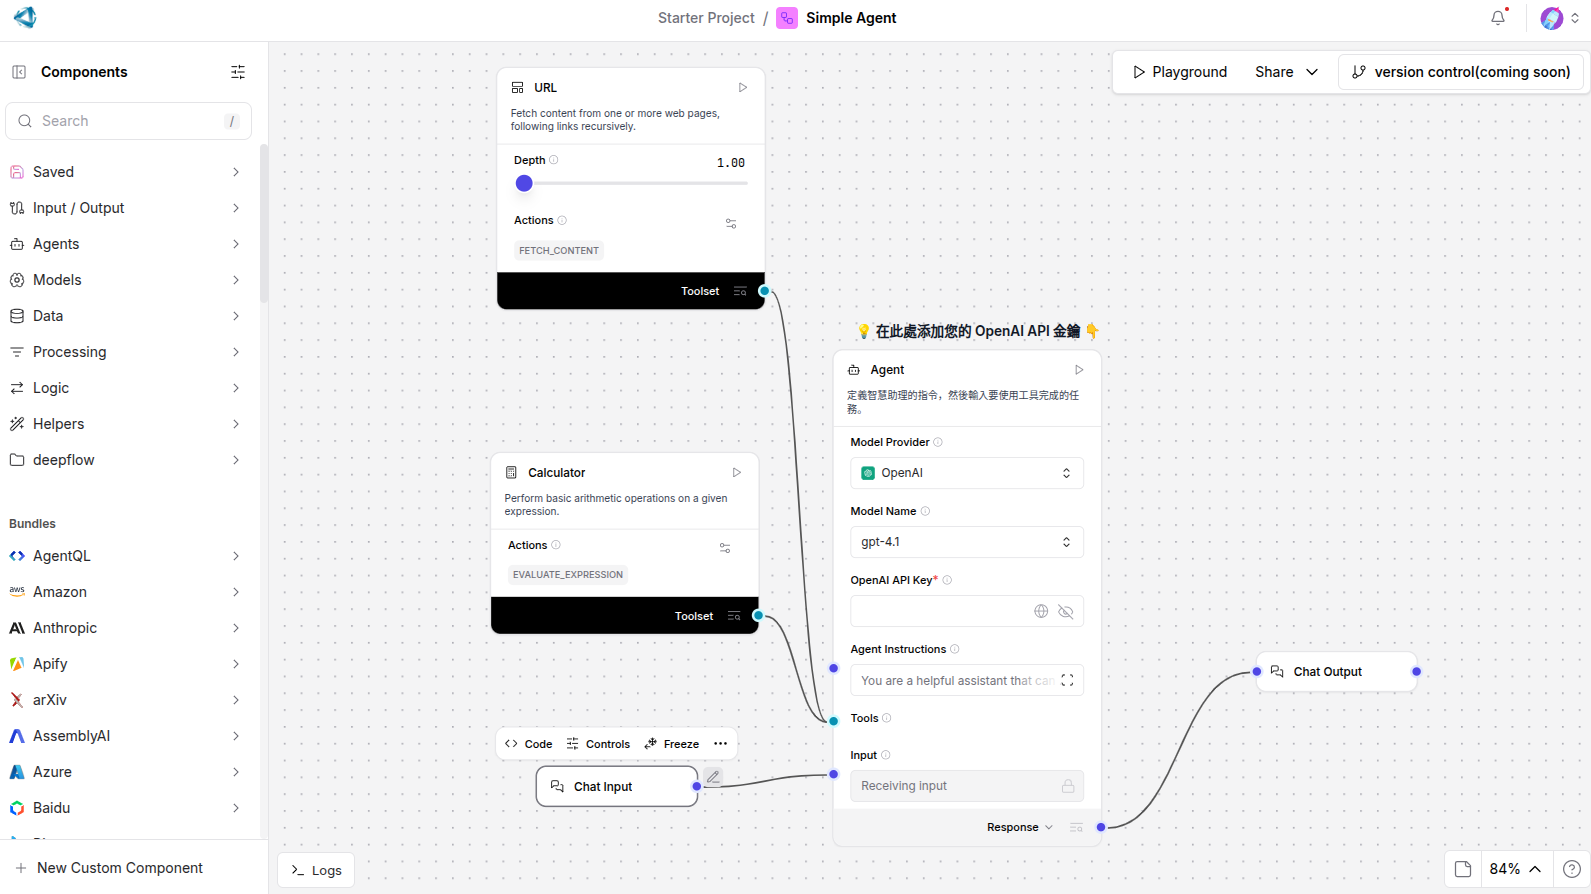
Simple Agent 範本由連接到 Chat Input 和 Chat Output Components 的 Agent Component、Calculator Component 和 URL Component 組成。當您執行此 Flow 時,您透過 Chat Input Component 向 Agent 提交查詢,Agent 使用 Calculator 和 URL 工具生成回應,然後透過 Chat Output Component 返回回應。
許多Components可以作為 Agent 的工具,包括 Model Context Protocol (MCP) 伺服器。Agent 根據給定查詢的上下文決定呼叫哪些工具。
-
在 Agent Components中,直接輸入您的 OpenAI API 金鑰或使用 全域變數。
此範例使用 Agent Components的內建 OpenAI 模型。 如果您想使用不同的提供者,請相應編輯模型提供者、模型名稱和憑證。 如果您的首選提供者或模型未列出,請將 Model Provider 設定為 Connect other models,然後連接任何 語言模型Components。
-
要執行 Flow,點擊 Playground。
-
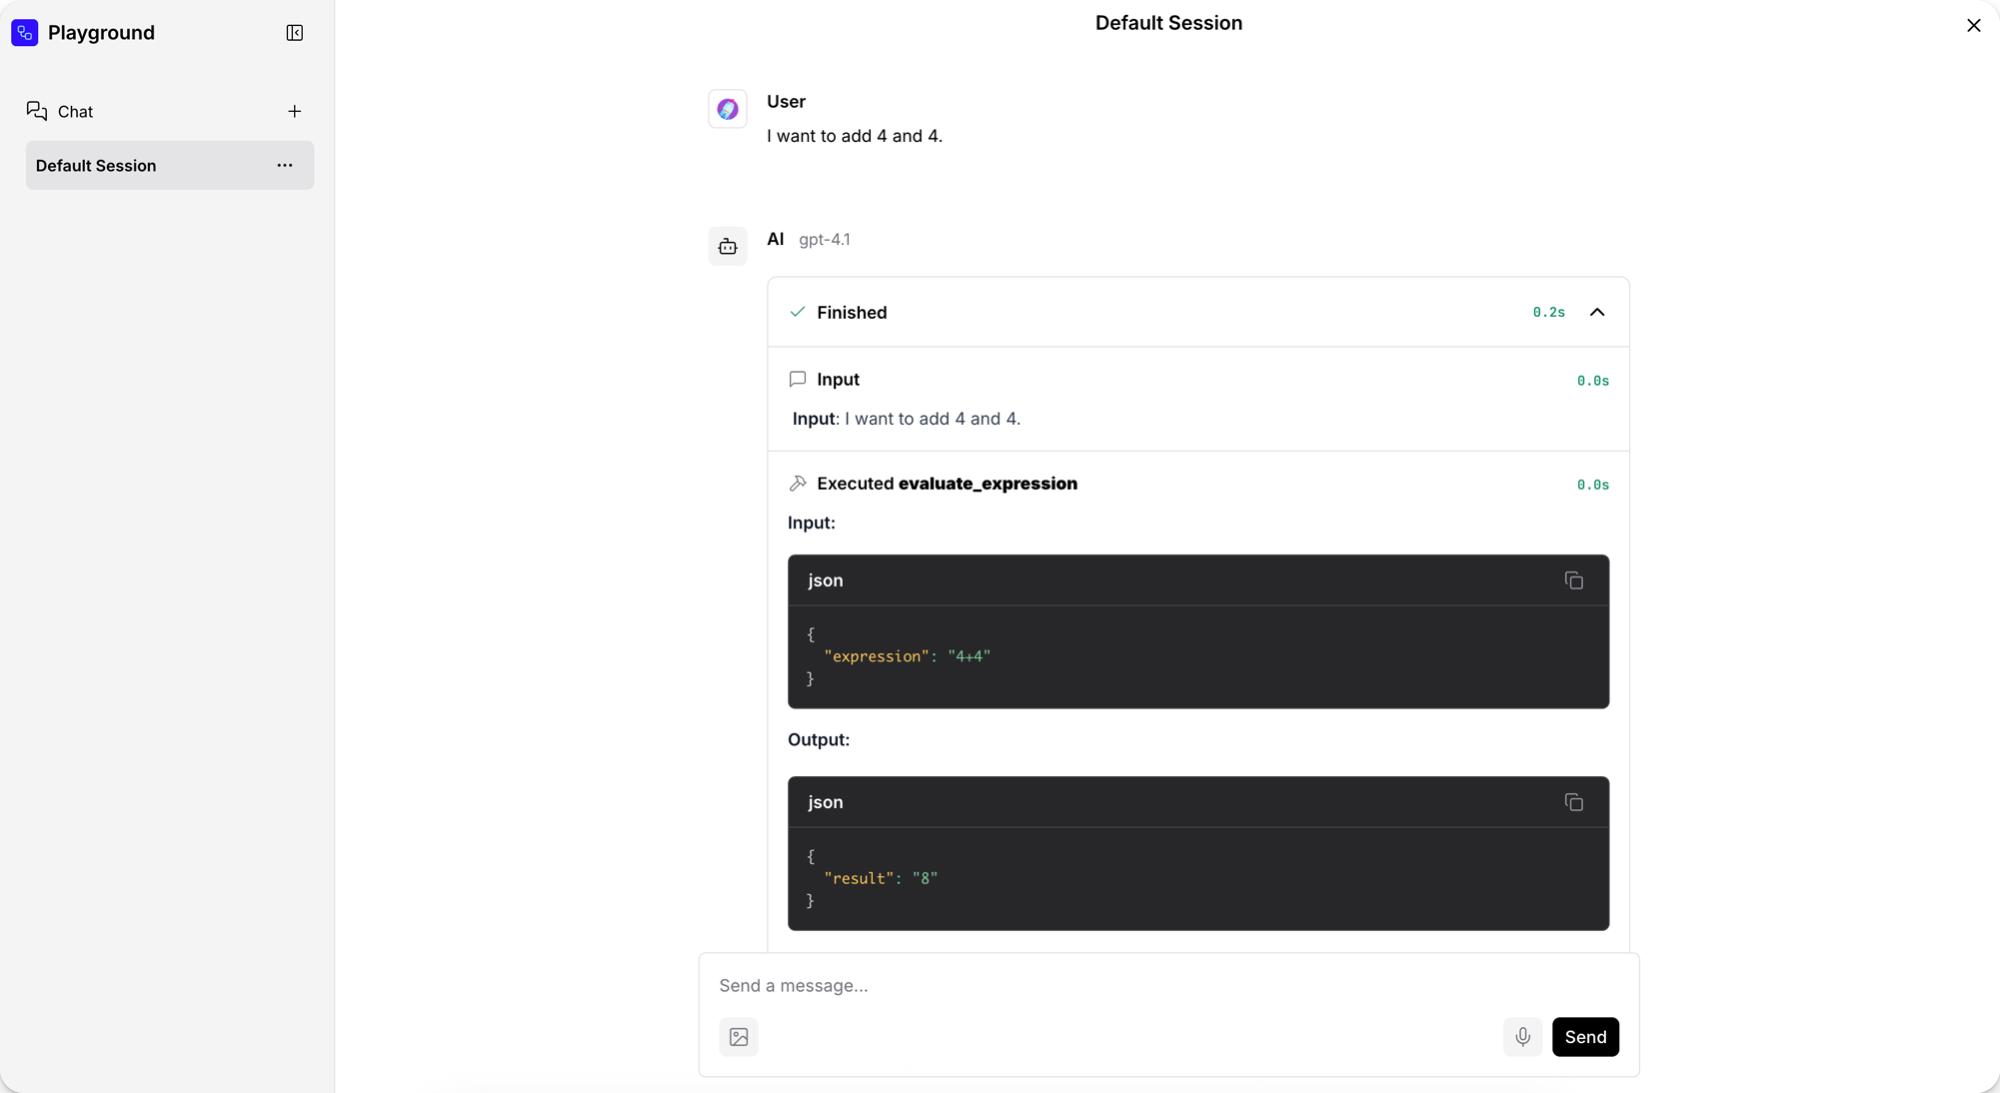
要測試 Calculator 工具,請向 Agent 詢問簡單的數學問題,例如
I want to add 4 and 4.為了幫助您測試和評估您的 Flow,Playground 顯示 Agent 的推理過程,因為它分析提示、選取工具,然後使用工具生成回應。 在這種情況下,數學問題導致 Agent 選取 Calculator 工具並使用如evaluate_expression的動作。
-
要測試 URL 工具,請向 Agent 詢問當前事件。 對於此請求,Agent 選取 URL 工具的
fetch_content動作,然後返回當前新聞標題的摘要。 -
當您完成測試 Flow 時,點擊 Close。
現在您已經執行了第一個FLOW,請嘗試這些下一步:
- 透過附加不同工具或新增更多 Components 到 Flow 來編輯您的 Simple Agent Flow。
- 從頭建構您自己的 Flow 或透過修改其他範本 Flow。
- 將 Flow 整合到您的應用程式中,如 從外部應用程式執行您的 Flow 中解釋。
從外部應用程式執行您的 Flow
AgentBuilder 是一個 IDE,但它也是一種執行時,您可以透過 AgentBuilder API 使用 Python、JavaScript 或 HTTP 呼叫它。
當您在本機啟動 AgentBuilder 時,您可以向本機 AgentBuilder 伺服器傳送請求。 對於生產應用程式,您需要 部署穩定的 AgentBuilder 實例 來處理 API 呼叫。
例如,您可以使用 /run EndPoint 執行 Flow 並獲取結果。
AgentBuilder 提供程式碼片段來幫助您開始使用 AgentBuilder API。
-
在編輯FLOW時,點擊 Share,然後點擊 API access。
API 存取窗格中的預設程式碼使用 AgentBuilder 伺服器
url、headers和請求資料的payload建構請求。 程式碼片段自動包含 Flow 的AGENTBUILDER_SERVER_ADDRESS和FLOW_ID值,以及一個腳本,如果您在終端機會話中將其設定為環境變數,則包含您的AGENTBUILDER_API_KEY。 如果您為不同的伺服器或 Flow 使用程式碼,請替換這些值。 預設 AgentBuilder 伺服器地址是http://localhost:7860。- Python
- JavaScript
- curl
_29import requests_29_29url = "http://AGENTBUILDER_SERVER_ADDRESS/api/v1/run/FLOW_ID" # 此 Flow 的完整 API EndPoint URL_29_29# 請求 payload 配置_29payload = {_29"output_type": "chat",_29"input_type": "chat",_29"input_value": "hello world!"_29}_29_29# 請求標頭_29headers = {_29"Content-Type": "application/json",_29"x-api-key": "$AGENTBUILDER_API_KEY"_29}_29_29try:_29# 傳送 API 請求_29response = requests.request("POST", url, json=payload, headers=headers)_29response.raise_for_status() # 為不良狀態碼引發例外_29_29# 列印回應_29print(response.text)_29_29except requests.exceptions.RequestException as e:_29print(f"Error making API request: {e}")_29except ValueError as e:_29print(f"Error parsing response: {e}")_20const payload = {_20"output_type": "chat",_20"input_type": "chat",_20"input_value": "hello world!",_20"session_id": "user_1"_20};_20_20const options = {_20method: 'POST',_20headers: {_20'Content-Type': 'application/json',_20'x-api-key': 'AGENTBUILDER_API_KEY'_20},_20body: JSON.stringify(payload)_20};_20_20fetch('http://AGENTBUILDER_SERVER_ADDRESS/api/v1/run/FLOW_ID', options)_20.then(response => response.json())_20.then(response => console.log(response))_20.catch(err => console.error(err));_11curl --request POST \_11--url 'http://AGENTBUILDER_SERVER_ADDRESS/api/v1/run/FLOW_ID?stream=false' \_11--header 'Content-Type: application/json' \_11--header "x-api-key: AGENTBUILDER_API_KEY" \_11--data '{_11"output_type": "chat",_11"input_type": "chat",_11"input_value": "hello world!"_11}'_11_11# 200 回應確認呼叫成功。 -
複製片段,將其貼到腳本檔案中,然後執行腳本以傳送請求。 如果您使用 curl 片段,您可以直接在終端機中執行命令。
如果請求成功,回應包含關於 Flow 執行的許多詳細資訊,包括會話 ID、輸入、輸出、Components、持續時間等。 以下是執行 Simple Agent 範本 Flow 的回應範例:
結果
_162{_162 "session_id": "29deb764-af3f-4d7d-94a0-47491ed241d6",_162 "outputs": [_162 {_162 "inputs": {_162 "input_value": "hello world!"_162 },_162 "outputs": [_162 {_162 "results": {_162 "message": {_162 "text_key": "text",_162 "data": {_162 "timestamp": "2025-06-16 19:58:23 UTC",_162 "sender": "Machine",_162 "sender_name": "AI",_162 "session_id": "29deb764-af3f-4d7d-94a0-47491ed241d6",_162 "text": "Hello world! 🌍 How can I assist you today?",_162 "files": [],_162 "error": false,_162 "edit": false,_162 "properties": {_162 "text_color": "",_162 "background_color": "",_162 "edited": false,_162 "source": {_162 "id": "Agent-ZOknz",_162 "display_name": "Agent",_162 "source": "gpt-4o-mini"_162 },_162 "icon": "bot",_162 "allow_markdown": false,_162 "positive_feedback": null,_162 "state": "complete",_162 "targets": []_162 },_162 "category": "message",_162 "content_blocks": [_162 {_162 "title": "Agent Steps",_162 "contents": [_162 {_162 "type": "text",_162 "duration": 2,_162 "header": {_162 "title": "Input",_162 "icon": "MessageSquare"_162 },_162 "text": "**Input**: hello world!"_162 },_162 {_162 "type": "text",_162 "duration": 226,_162 "header": {_162 "title": "Output",_162 "icon": "MessageSquare"_162 },_162 "text": "Hello world! 🌍 How can I assist you today?"_162 }_162 ],_162 "allow_markdown": true,_162 "media_url": null_162 }_162 ],_162 "id": "f3d85d9a-261c-4325-b004-95a1bf5de7ca",_162 "flow_id": "29deb764-af3f-4d7d-94a0-47491ed241d6",_162 "duration": null_162 },_162 "default_value": "",_162 "text": "Hello world! 🌍 How can I assist you today?",_162 "sender": "Machine",_162 "sender_name": "AI",_162 "files": [],_162 "session_id": "29deb764-af3f-4d7d-94a0-47491ed241d6",_162 "timestamp": "2025-06-16T19:58:23+00:00",_162 "flow_id": "29deb764-af3f-4d7d-94a0-47491ed241d6",_162 "error": false,_162 "edit": false,_162 "properties": {_162 "text_color": "",_162 "background_color": "",_162 "edited": false,_162 "source": {_162 "id": "Agent-ZOknz",_162 "display_name": "Agent",_162 "source": "gpt-4o-mini"_162 },_162 "icon": "bot",_162 "allow_markdown": false,_162 "positive_feedback": null,_162 "state": "complete",_162 "targets": []_162 },_162 "category": "message",_162 "content_blocks": [_162 {_162 "title": "Agent Steps",_162 "contents": [_162 {_162 "type": "text",_162 "duration": 2,_162 "header": {_162 "title": "Input",_162 "icon": "MessageSquare"_162 },_162 "text": "**Input**: hello world!"_162 },_162 {_162 "type": "text",_162 "duration": 226,_162 "header": {_162 "title": "Output",_162 "icon": "MessageSquare"_162 },_162 "text": "Hello world! 🌍 How can I assist you today?"_162 }_162 ],_162 "allow_markdown": true,_162 "media_url": null_162 }_162 ],_162 "duration": null_162 }_162 },_162 "artifacts": {_162 "message": "Hello world! 🌍 How can I assist you today?",_162 "sender": "Machine",_162 "sender_name": "AI",_162 "files": [],_162 "type": "object"_162 },_162 "outputs": {_162 "message": {_162 "message": "Hello world! 🌍 How can I assist you today?",_162 "type": "text"_162 }_162 },_162 "logs": {_162 "message": []_162 },_162 "messages": [_162 {_162 "message": "Hello world! 🌍 How can I assist you today?",_162 "sender": "Machine",_162 "sender_name": "AI",_162 "session_id": "29deb764-af3f-4d7d-94a0-47491ed241d6",_162 "stream_url": null,_162 "component_id": "ChatOutput-aF5lw",_162 "files": [],_162 "type": "text"_162 }_162 ],_162 "timedelta": null,_162 "duration": null,_162 "component_display_name": "Chat Output",_162 "component_id": "ChatOutput-aF5lw",_162 "used_frozen_result": false_162 }_162 ]_162 }_162 ]_162}
在生產應用程式中,您可能想要選取此回應的部分以返回給使用者、儲存在日誌中等。下一步演示如何從 AgentBuilder API 回應中提取資料以在您的應用程式中使用。
從回應中提取資料
以下範例建構於 API 窗格的範例程式碼之上,以在您的終端機中建立問答聊天,並儲存 Agent 的先前答案。
-
將您的 Simple Agent FLOW的
/run片段整合到以下腳本中。 此腳本在您的終端機中執行問答聊天,並儲存 Agent 的先前答案,以便您比較它們。- Python
- JavaScript
_59import requests_59import json_59_59url = "http://AGENTBUILDER_SERVER_ADDRESS/api/v1/run/FLOW_ID"_59_59def ask_agent(question):_59payload = {_59"output_type": "chat",_59"input_type": "chat",_59"input_value": question,_59}_59_59headers = {_59"Content-Type": "application/json",_59"x-api-key": "AGENTBUILDER_API_KEY"_59}_59_59try:_59response = requests.post(url, json=payload, headers=headers)_59response.raise_for_status()_59_59# 獲取回應訊息_59data = response.json()_59message = data["outputs"][0]["outputs"][0]["outputs"]["message"]["message"]_59return message_59_59except Exception as e:_59return f"Error: {str(e)}"_59_59def extract_message(data):_59try:_59return data["outputs"][0]["outputs"][0]["outputs"]["message"]["message"]_59except (KeyError, IndexError):_59return None_59_59# 儲存來自 ask_agent 回應的先前答案_59previous_answer = None_59_59# 終端機聊天_59while True:_59# 獲取使用者輸入_59print("\nAsk the agent anything, such as 'What is 15 * 7?' or 'What is the capital of France?')")_59print("Type 'quit' to exit or 'compare' to see the previous answer")_59user_question = input("Your question: ")_59_59if user_question.lower() == 'quit':_59break_59elif user_question.lower() == 'compare':_59if previous_answer:_59print(f"\nPrevious answer was: {previous_answer}")_59else:_59print("\nNo previous answer to compare with!")_59continue_59_59# 獲取並顯示答案_59result = ask_agent(user_question)_59print(f"\nAgent's answer: {result}")_59# 儲存答案以供比較_59previous_answer = result_74const readline = require('readline');_74_74const rl = readline.createInterface({_74input: process.stdin,_74output: process.stdout_74});_74_74const url = 'http://AGENTBUILDER_SERVER_ADDRESS/api/v1/run/FLOW_ID';_74_74// 儲存來自 askAgent 回應的先前答案_74let previousAnswer = null;_74_74// Agent flow, with question as input_value_74async function askAgent(question) {_74const payload = {_74"output_type": "chat",_74"input_type": "chat",_74"input_value": question_74};_74_74const options = {_74method: 'POST',_74headers: {_74'Content-Type': 'application/json',_74'x-api-key': 'AGENTBUILDER_API_KEY'_74},_74body: JSON.stringify(payload)_74};_74_74try {_74const response = await fetch(url, options);_74const data = await response.json();_74_74// 從巢狀回應中提取訊息_74const message = data.outputs[0].outputs[0].outputs.message.message;_74return message;_74} catch (error) {_74return `Error: ${error.message}`;_74}_74}_74_74// 終端機聊天_74async function startChat() {_74console.log("\nAsk the agent anything, such as 'What is 15 * 7?' or 'What is the capital of France?'");_74console.log("Type 'quit' to exit or 'compare' to see the previous answer");_74_74const askQuestion = () => {_74rl.question('\nYour question: ', async (userQuestion) => {_74if (userQuestion.toLowerCase() === 'quit') {_74rl.close();_74return;_74}_74_74if (userQuestion.toLowerCase() === 'compare') {_74if (previousAnswer) {_74console.log(`\nPrevious answer was: ${previousAnswer}`);_74} else {_74console.log("\nNo previous answer to compare with!");_74}_74askQuestion();_74return;_74}_74_74const result = await askAgent(userQuestion);_74console.log(`\nAgent's answer: ${result}`);_74previousAnswer = result;_74askQuestion();_74});_74};_74_74askQuestion();_74}_74_74startChat(); -
要檢視 Agent 的先前答案,請輸入
compare。要關閉終端機聊天,請輸入exit。
使用調整來對FLOW執行應用臨時覆寫
您可以在請求中包含調整來臨時修改FLOW參數。 調整被新增到 API 請求,並在您的FLOW中臨時變更Components參數。 調整僅覆寫FLOW的Components設定一次執行。 它們不會修改基礎FLOW配置或在執行之間持續存在。
調整被新增到 /run EndPoint 的 payload。
為了協助格式化,您可以在複製程式碼片段之前在 AgentBuilder 的 Input Schema 窗格中定義調整。
- 要開啟 Input Schema 窗格,從 API access 窗格中,點擊 Input Schema。
- 在 Input Schema 窗格中,選取您要在下一個請求中修改的參數。 在 Input Schema 窗格中啟用參數不會永久變更列出的參數。它只會將它們新增到範例程式碼片段中。
- 例如,要將 LLM 提供者從 OpenAI 變更為 Groq,並在請求中包含您的 Groq API 金鑰,請選取值 Model Providers、Model 和 Groq API Key。
AgentBuilder 根據您的輸入參數更新程式碼片段中的
tweaks物件,並包含預設值來指導您。 在您的腳本中使用更新的程式碼片段來使用您的覆寫執行您的FLOW。
_12payload = {_12 "output_type": "chat",_12 "input_type": "chat",_12 "input_value": "hello world!",_12 "tweaks": {_12 "Agent-ZOknz": {_12 "agent_llm": "Groq",_12 "api_key": "GROQ_API_KEY",_12 "model_name": "llama-3.1-8b-instant"_12 }_12 }_12}